Vue - 使用 GitHub Actions 部署到 GitHub Pages

Vue - 使用 GitHub Actions 部署到 GitHub Pages

GitHub Actions 是 GitHub CI/CD 服務,當我們在推完 code 後,透過 Actions 的設定,就能幫助我們將 build 出來的檔案自動部署到 Github Pages。只要設定好後就不怕會推失敗啦~

1. 專案設定 GitHub

如果你的專案本來就有設定 git 就可以直接跳過這一段,如果你是重新起一個專案則可以先依照以下步驟為專案加上 git。

1
2
git init
git remote add origin [email protected]:[用户名]/[儲存庫名稱].git

也可以再另外加入 .gitignore 將不上 GitHub 的項目排除,像是 node_modules

2. package.json 設定

在 package.json 加上 homepage: “https://[用户名].github.io/[项目名]”

3. 設定 Personal Token

從右上角個人設定的 Settings 進入後,點入左邊側欄的 Developer Settings 並點擊 Personal access tokens 就可以進入到建立頁面

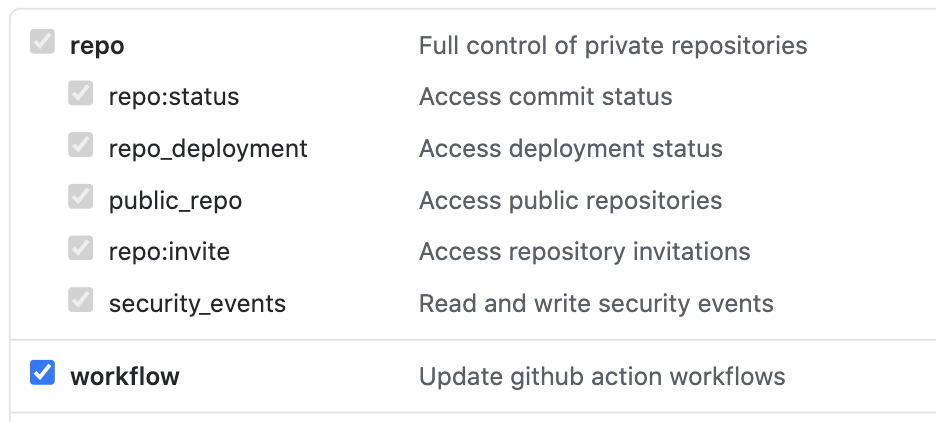
建立頁面可以選擇這個 token 可觸及的相關權限,因為要使用 Actions 所以至少要勾 workflow (勾選 workflow 後會自動勾選第一個 repo 相關)

選擇後就可以點擊 Generate token,接著就會得到之後會用到的 token 了

官方的 Personal Token 說明
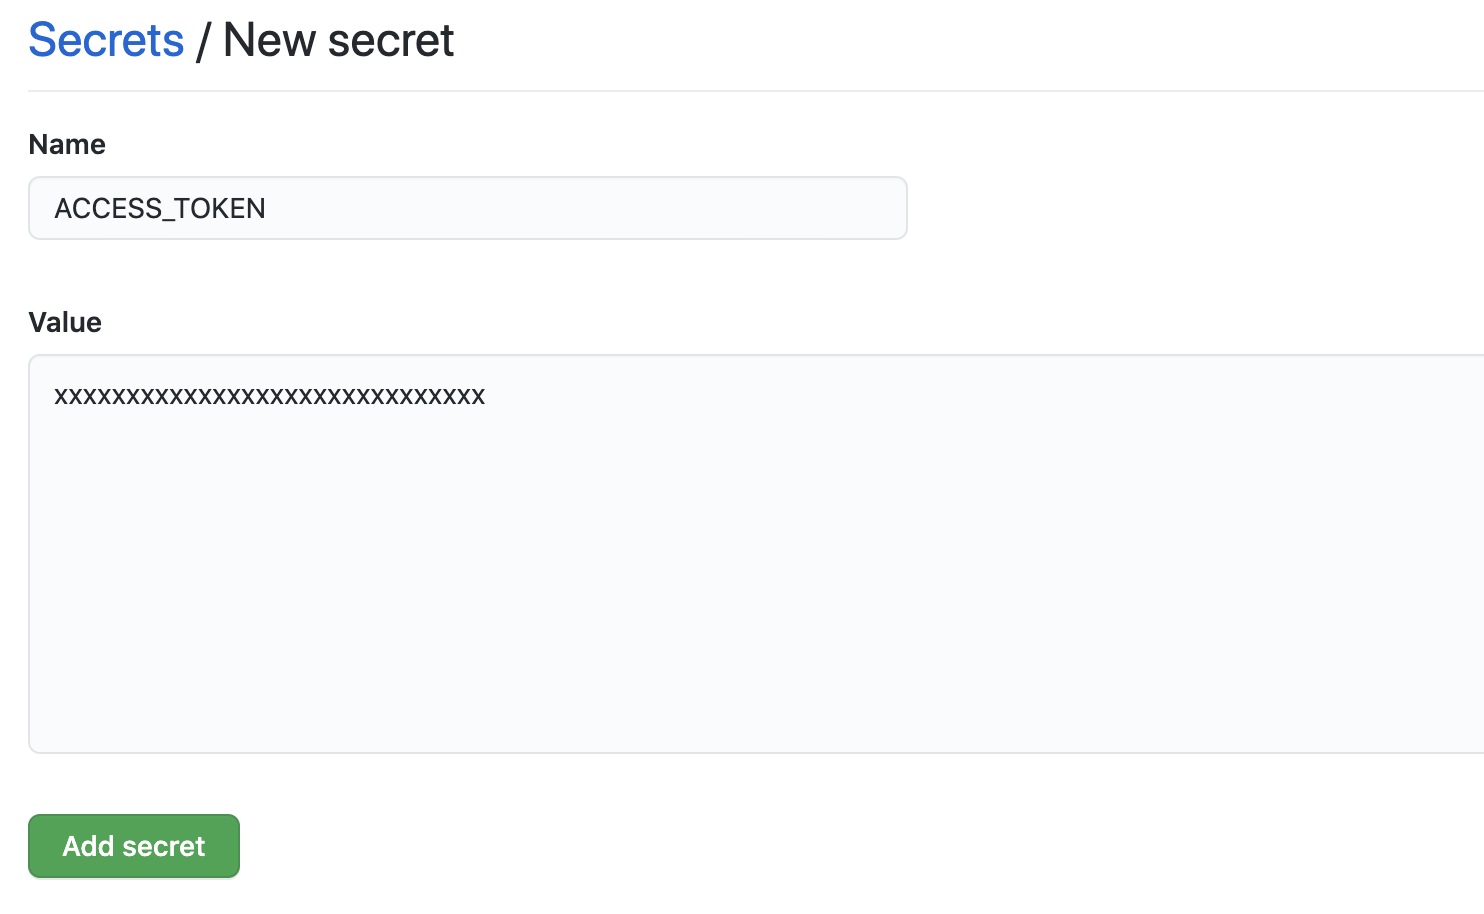
https://docs.github.com/cn/free-pro-team@latest/github/authenticating-to-github/creating-a-personal-access-token

4. 在儲存庫設定 Secrets

在 Actions 的 yaml 檔中會用到剛剛建立的 token,但這並不建議被直接寫在 .yaml 中曝光,所以需要到 Secrets 中設定,概念上和 .env 是類似的~

如圖:Name 為 ACCESS_TOKEN,value 則是上一個步驟建立的 Personal token,複製貼過來就可以哩

到這邊基本設定都已經完成了,接著就可以進入真正的正題了~~

5. 設定 Actions

點一下 Actions 中的 setup workflow,就會進入到 yaml 檔編寫的地方,透過這個 yaml 檔案就可以設定這個工作流程被觸發的時機點,以及做哪些事情。

  • name: 工作流程的名稱
  • on: 必要的,設定觸發工作流程的 GitHub 事件的名稱

    以下面 yaml 範例舉例,指的是 push 和 PR 的時候觸發,而觸發的 branches 都設定在 master

  • jobs: 工作流程

    build 這邊是指工作流程會包含一個名為 build 的項目,那 runs-on 則是要跑在什麼環境之下

    接下來的 steps 是寫入執行步驟:

    第一步是用來複製出一份程式碼並對其進行行為,例如:打包、測試等

    第二步是 build 出 dist 並把 dist 推到 gh-pages 這個分支

完整內容如下

1
2
3
4
5
6
7
8
9
10
11
12
13
14
15
16
17
18
19
20
21
22
23
24
25
26
27
28
29
30
31
32
33
34
35
36
37
38
39
40
# This is a basic workflow to help you get started with Actions
name: deploy

# Controls when the action will run.
on:
# Triggers the workflow on push or pull request events but only for the main branch
push:
branches:
- master
pull_request:
branches:
- master

# Allows you to run this workflow manually from the Actions tab
workflow_dispatch:

# A workflow run is made up of one or more jobs that can run sequentially or in parallel
jobs:
# This workflow contains a single job called "build"
build:
# The type of runner that the job will run on
runs-on: ubuntu-latest

# Steps represent a sequence of tasks that will be executed as part of the job
steps:
# Checks-out your repository under $GITHUB_WORKSPACE, so your job can access it
- uses: actions/checkout@v2

- name: Install & Build # 執行指令
run: |
npm install
npm run build

# Runs a single command using the runners shell
- name: Deploy
uses: JamesIves/github-pages-deploy-action@releases/v4
with:
ACCESS_TOKEN: ${{ secrets.ACCESS_TOKEN }} # Settings > Secret 建立的 ACCESS_TOKEN,推同個 repo 的話可以不需要
BRANCH: gh-pages # deploy 到 gh-pages 這個分支
FOLDER: dist # build 後的資料夾

完成 yaml 後就可以 Start Commit 了

註:新建立的 repo 現在預設的可能會是 main 這個 branch(如果已有 master 就可能會在 master)

完成後建立,就會跑一次了

跑完後如果有看到分支中多出 gh-pages 就代表成功哩
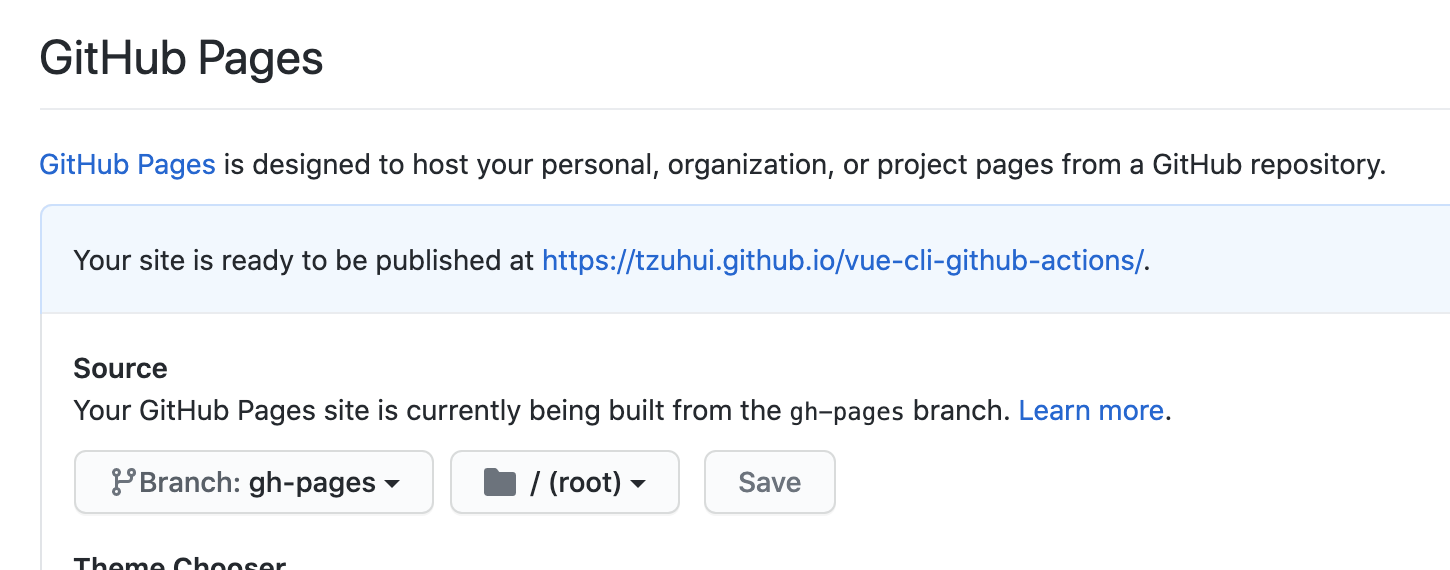
6. 確認完成

接著只要到 Settings 設定 GitHub Pages 就可以了

以上就是設定 Github Actions 的過程,這樣一來只要 push 之後就可以順利部署,也就不需要手動處理這一段囉

評論

Your browser is out-of-date!

Update your browser to view this website correctly. Update my browser now

×